
Ever get into a rut with your healthy eating efforts, where you just can’t bear to see another dry, dusty BSCB (that is, a Boneless Skinless Chicken Breast) in your lunch salad?
I feel you.
So, I’ve found a better way! Yes, it’s still chicken. And it’s still a pretty healthy source of protein. But gone are the days of dry, overcooked meat in the Quake household. Plus, say goodbye to the oven heating up your house during summer while you do your week’s meal prep… This preparation method is strictly stovetop, and it’s so easy a monkey could do it. In 25 minutes max (20 of which is totally hands off) you can have a week’s worth of delicious chicken to throw on salads, in a wrap, or into a curry or stew.

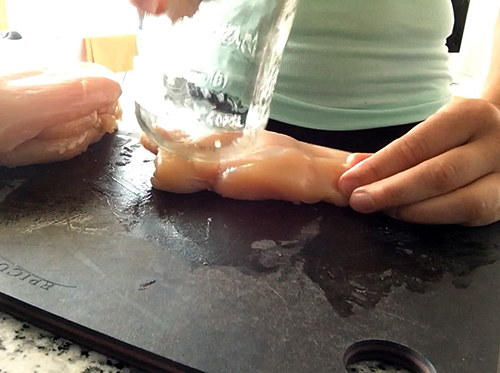
Step 1: Smash!
You don’t need to go overboard with this step, but it’s ideal if the chicken breasts are all at a relatively similar thickness, so they might need a little smashing. I don’t own one of those awesome meat tenderizer mallets, but you can use the bottom of a Mason jar to do this! (Who knew?). While you’re (um) bashing your breasts, heat a swirl of extra virgin olive oil in a large frying pan (that has a good lid), on medium-high heat.

Step 2: Hit It and Flip It.
Place your nicely tenderized chicken breasts in a single layer in your pan. Reduce the heat to medium. Salt and pepper the exposed side. I like to add some garlic powder as well. After 2 minutes, turn all the pieces over, and quickly repeat the seasoning process
Step 3: Slow and Low.
Don’t wait! As soon as you’ve seasoned the other side, put the lid on, and reduce the heat to the lowest setting. Set a timer for 10 minutes. DO NOT open the lid to check on the chicken, at any point. Trust that the magic is happening. Options during this time include but are not limited to: kitchen dance party, 2 rounds of a Tabata workout, paying your bills, or a quick make-out session.

Step 4: Do Not Disturb.
Ding goes the timer. Take the pan off the heat. Keep your paws off that lid! Set your timer for another 10 minutes, and let your chickens continue to schvitz in peace. See above for options to while away the time…
Step 5: Behold!

Once your timer rings again, you can finally take the lid off and behold the juiciest, most tender and delicious BSCB’s you’ve ever made. A meat thermometer would be ideal here, to confirm the internal temperature. I like to live on the edge, so I just cut partially through a couple of pieces in the thickest areas to see that the juice is clear and there’s no pink left. If you find your chicken isn’t quite done at this point, just put the lid back on, heat over medium for 3-4 minutes, and then let sit again off the heat for another 3-4. I have used this technique 4 times now, and only had to do this one time, with a single piece of chicken. The meat comes out beautifully every time!
Step 6: Sky’s the limit!
Most BSCB’s available in the grocery store are utterly massive, so to get an actual recommended single serving size, cut each breast in half.
I chop up and throw mine in wraps and over salads, or heat up for dinner with rice and veggies. I’m sure you’ve got more creative ideas for yours though!

Good to know: Mr. Quake has used this technique with chicken thighs as well. Also: I’ve only used a non-stick pan, but a regular pan should work just fine too!